Monday, November 17, 2008

Spicy Coconut Soup

First thing's first. How cute is Squash??

From Food pics


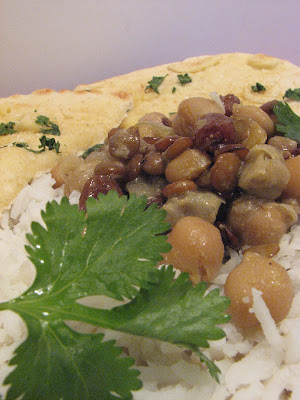
I think I mentioned this in a past post, but I LOVE curry. I mean L-O-V-E. I could live off curry for the rest of my life and be happy. If I had to choose a final meal, it would be red curry (Thai, not Indian, you know, with the coconut milk - yum), Tom Yum soup from my favorite Thai restaurant in MA, asiana's, with Thai iced tea. EJ loves curry just as much as me, and we are pleased that we found a local place that has excellent red curry. My goal? To beat it. I have more incentive than the satisfaction of being able to prepare what is honestly my favorite food (no need to leave the house after I've accomplished THAT feat!), but EJ said if I can make a curry comparable to this, we can get a puppy. I'm just like the Obama girls. So wish me luck, and I'll keep updating the curry thread.

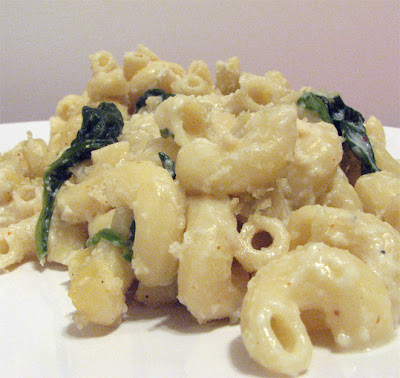
What I made last night (that we ate with our take-out curry); coconut soup. The first time I ate in a Thai restaurant, I had chicken coconut soup with pad thai, and that was when I fell in love with Thai food. The soup from last night was tasty, and super easy - I just packed in what I had in my pantry, and voila! Pretty tasty soup. Try it with Morningstar chicken strips!

From Food pics


Ingredients:

1/4 can coconut milk
1 cup veg broth (I use about 1 cup water and 3 veg cubes)
6 oz fresh spinach (ok, I admit, not found in the pantry, but frozen would work too)
1/2 clove garlic, minced
2 tbsp sugar
2-3 tbsp soy sauce
1/4 cup onion, chopped
1/2 tsp chili powder (or to taste)
1/2 package extra firm silken tofu, cubed

Combine everything in a saucepan, and heat. Stir frequently. Enjoy!

Friday, October 24, 2008

"Creamy" Mac & "Cheese"

I have been on the search for a good vegan mac and cheese for a long time. True, EJ and I aren't vegan, and we have a lot of love for cheese. I mean a LOT of love for cheese. But, we also try to be health conscious at least part of the time, and I can't justify making a homemade mac and cheese all that often. But with this recipe, I can.

I have had some disasters in the kitchen when it comes to making vegan mac and cheese - some things were completely inedible. Seriously, my big piece of advice is this: avoid recipes that call for 3 cups nutritional yeast and claim it tastes just like cheese. This is a LIE. Nutritional yeast is good, but only in moderation.

Another note about this recipe. I don't feel comfortable saying it is completely original. I have tweaked it a bit, and I'm pretty happy with the results, but I wouldn't have been able to do it without a little help from Vegan Planet.

This recipe is dedicated to Rachel, who asks me for it all the time :)

From Food pics


Vegan Mac and Cheese

Ingredients:
Elbow macaroni
1 block soft silken tofu
2 cups soy milk
1/2 chopped yellow onion
1 garlic clove
1 tbsp miso paste
1 tbsp dry mustard
1-2 tbsp nutritional yeast
large sprinkle nutmeg
Cajun seasoning, to taste (I use about 1-2 tbsp)
salt, pepper, to taste
bread crumbs
Spinach (I use about half a bag of fresh spinach but frozen will work too, just thaw it and get out as much water as possible)
3 tbsp olive oil


1. In a large pot of salted water, cook the macaroni until al dente.

2. Preaheat the oven to 375.

3. Meanwhile, get out the blender and blend together the onion, tofu, soy milk, garlic, miso, mustard, nutritional yeast, nutmeg, olive oil, about 3/4 the cajun seasoning, salt and pepper until smooth. At this point, I taste it to see if I like the flavor. If not, add more spices.

4. Spray some oil on a 13 x 9 casserole dish. Drain the macaroni and dump it all into the casserole dish. Pour the tofu mixture over it, reserving about 1-2 cups of the liquid. Mix well, cover all the pasta. Break the spinach up into small pieces and mix it here, too. The heat of the pasta will help steam it, so it might be easier to mix the spinach with the pasta before adding the tofu mixture. Another trick that I do is take about half the spinach, and throw it in with the boiling water when cooking the pasta. It only need to be in the water for a second, so I put it in, stir it, and drain the pasta. Don't do this with all the spinach because it will clump. I recommend doing that to half and adding the other half when mixing it in the casserole dish.

5. Cover the casserole dish with tin foil and bake 25 minutes.

6. Remove from oven. Pour the rest of the tofu mixture over the macaroni and mix well.

7. Mix the bread crumbs (about 1/4 - 1/2 cup) with a little olive oil and sprinkle about half of it all over macaroni. Mix lightly, just mixing the bread crumbs with the top layer of pasta. Sprinkle the rest over the top with the rest of the cajun seasoning.

8. Bake, uncovered, for another 10 minutes.

NOTE: Instead of bread crumbs, spin some almonds in a coffee grinder until coarsely powdered and use in place of the bread crumbs.

From Food pics

Monday, October 20, 2008

Green Curry

I have tried and tried to make a curry that I am truly happy with. The ones I've made in the past are ok, but not great. I wouldn't order them in a restaurant. And if I had something like that in a restaurant, I would say "meh". EJ even bought me a book on curry for last christmas, and still all my curries are simply meh. Now that I'm happy with the way this green curry came out, I want to experiment with more red curries. I'll keep you all updated.

A dear friend has told me that he has conquered a never fail curry recipe, and so I dedicate this to Joe. Thanks, man :)

From Food pics


Joe's Curry:

Ingredients:
2 cloves garlic, minced
1 white or yellow onion
3 cups vegetable stock
1 can chick peas
1 cup dry lentils
1 bottle curry paste (the one I bought was green curry, about a 3/4 cup of paste).
1 tbsp curry powder
3 tbsp raisins (optional)
1 tsp garam massala
1/2 tsp ground cloves, or about a tbsp whole cloves
1 tsp minced ginger
crushed red pepper, to taste
dry basmati rice
cumin seed
mustard seed
flat bread
cilantro

1. Saute garlic in olive oil for 30 seconds, and add chopped onion. Saute until the onion becomes slightly translucent.

2. Add stock, chickpeas, lentils, curry paste, cury powder, garam masala, crushed red pepper, raisins, ginger and cloves. (here's the thing about using cloves. The ground cloves are about 10x more concentrated, so be careful. Its a little safer to use the whole cloves, but they are not good to eat. You can eat them, but I don't recommend it. When I made this, I actually went through and picked out the whole cloves before I served it so that EJ wouldn't accidentally eat one. That was a pain. However, Breza says that if you cook it for long enough, the cloves are edible. Worth a try. I'll keep everyone updated.)

3. Let the curry simmer for awhile, I try to let it simmer for at least an hour. You can also add tofu or TVP or anything else to give it a thicker consistency.

4. Meanwhile, you can prepare the rice. Toast about 1 tsp mustard seed and 1/2 tsp cumin seed until it pops (on the stove top) and prepare the rice the way you normally do. We have a rice cooker, which I swear by. The water : rice ratio should be 2 : 1. Add the spices to this and cook as usual.

5. For the naan, I purchased some flat bread from the grocery store (though naan is usually available at Indian grocers). I spread some margarine over it, sprinkled with garlic powder, onion powder, fresh cilantro and Parmesan cheese, and baked about 5 minutes at 350. This was GOOD.

6. Ok, back to the curry. Here you have a couple of options. To thicken it, add about 2-3 tbsp corn starch. You could also use flour, but corn starch is more concentrated, so it has less of a grainy texture. Don't add too much, though. You can also add a little milk or cream to soften the texture, but that is optional. Simmer a bit longer, until it has reached the desired consistency.

7. Mix in a handful of fresh cilantro.

8. Serve over rice with naan. Plain yogurt on the side is also really good for this dish.

From Food pics


Thanks for the help, Joe. I really enjoyed making this.

From Food pics

Cheese and garlic bread

This recipe goes along with comfort foods, because there is nothing better than hot bread, fresh from the oven. This was also the first recipe I could put together on my own. My mom's kitchen was the best to cook in (of course I didn't realize at the time - I only realized when I had my own kitchen and discovered that my gadgets aren't nearly as high quality as my mother's. Nor do I have as much counter space). When I tried the recipe (and it worked!) I was ecstatic, and baked the bread all the time. As time went on, I baked less and less, and cooked more and more, until here I am, 15 years later, in search of that original recipe. I tried several, and none were quite right, and after a lot of tweaking, I finally decided on the final version. And now I present Baby Melissa's Cheese Bread (with modifications).

Ingredients:
2 cups warm milk
2 packets active dry yeast
2 tsp salt
1 tsp sugar
2 tbsp butter
1/2 tsp garlic powder
1/2 tsp onion powder
1 cup grated cheddar cheese
3 tbsp grated Parmesan cheese
5 cups flour

1. Heat milk - I microwave 2 cups of milk for 2 1/2 minutes. You want it hot, but not so hot that it gets a skin. Mix the milk and the 2 packets of yeast in a bowl. Let sit 5 minutes.

2. After 5 minutes, add garlic, onion, salt, sugar, butter and about a quarter of the cheese. The reason I add some of the cheese now is because the hot milk will melt it, mixing it with everything. I like to keep some of it for later so that there are also pieces of cheese in the bread.

3. Add the flour, a little at a time. Also add the rest of the cheese, but reserve a little Parmesan for a garnish. When it becomes too hard to stir with a spoon, I knead it in the bowl with my hands. If you choose to do this (if you don't have an electric mixer, like myself (ahem, christmas present!?!)), put some oil on your hands so the dough doesn't stick to them as much.

4. Once the dough is kneaded, grease 2 bread pans and divide the dough in half. Put some more oil on your hands and press the dough into the pan - not too firmly, but you want the dough to reach all the corners. The oil on your hands help coat the bread with oil, too - it will brown nicely. Now, sprinkle some Parmesan cheese on top for a garnish.

5. Cover with a damp dish cloth and let rise for ~ 1 hour.

From Food pics


This is what it will look like after an hour (it should double in size).

From Food pics


6. Preheat the overn to 350. Bake for 20-25 minutes. Serve warm.

From Food pics

Wednesday, October 15, 2008

Apricot and Brie Sandwiches

These sandwiches are simple, yet still have an elegant feel to them. They would be a nice addition to a picnic platter, or could be served as an hors d'oeuvre at a dinner party (here's the thought - slice them into bite size pieces and spear them with a toothpick).

APRICOT AND BRIE SANDWICHES

Ingredients:

Ciabatta bread
Apricot preserves
Pecans (roasted)
Brie, sliced

1. Assemble sandwich. Gaze at it longingly. Take first bite. Be surprised and pleased.

E.J.'s Favorite Sandwich

Really, he loves it. I love it because its flavorful and super easy.

Ingredients:

ciabatta bread
1-2 squash (cut in half then sliced lengthwise)
1-2 zucchini (cut in half then sliced lengthwise)
fresh spinach, a handful
fresh mozzarella
pesto
garlic powder (sprinkle)
onion powder (sprinkle)
salt, pepper, to taste
olive oil

1. Roast the vegetables. There are a couple of ways to do this. The easiest thing is to put them on a cookie sheet with a little spray oil (very little, but make sure they won't stick to the pan). Sprinkle with the spices to taste. A very light sprinkle will do. Roast them in the oven at 350 degrees for ~10 minutes. You could also grill the vegetables. I saute them in a cast iron skillet that has grooves like a grill. Whichever method you choose, be sure to not cook them too long, because they can get soggy. The goal is to have them soft, but not too soft.

Also, don't feel limited to only using squash and zucchini. Mushrooms, eggplant, carrots and other squashes would all be great in this sandwich.

2. Sandwich assembly. Spread a light layer of pesto on each slice of bread. Layer the zucchini and squash, add some fresh spinach and a few slices of fresh mozzarella. Any cheese will do, but I think the fresh mozzarella really brings the sandwich together.

3. Wrap each sandwich in tin foil. Stick them in the onion (hot from roasting the veggies) for about 10 minutes. Unwrap the tin foil (its not hot) and serve hot. The cheese will be all melty and the bread warm. Mmmmmm......

From Food pics

Tuesday, September 30, 2008

Cheesy, yummy lasagna

Comfort food is something we all need once in a while. I needed some comfort food Sunday night. Typical comfort food for me is thick, hot, cheesy Italian food, maybe because my family is italian and it brings me back to my roots. I remember Sunday dinners at my grandma's. We would walk in, and her house would smell like gravy, and there would be bread everywhere, and all my aunts and uncles and cousins would be there. we would all sit at her dining room table under her replication of the Last Supper and eat and eat. All her food was covered with meat, and were my grandmother alive, she would probably not love the fact that I no longer eat meat. Indeed, my uncles tease me for it every time I see them (though they are very accommodating).

So enough blabbing, time to start talking about the food! This really hit the spot for both me and EJ.

From Food pics


Ingredients:

1 package lasagna noodles
1 tub ricotta cheese (part-skim)
2 packages shredded mozzarella cheese (part-skim)
2 eggs
1/4 - 1/2 tsp salt
1/4 tsp pepper
1/2 tsp basil
1/2 tsp oregano
1/2 package fresh spinach
1-2 jars tomato sauce

1. Preheat oven to 375.
2. Start a large pot of boiling water. Add a couple tablespoons of salt to it.
3. Meanwhile, in a large bowl, combine ricotta, eggs, 1 package mozzarella cheese, and spices. Mix well. I like to use my hands, though this can get cold!
4. Place lasagna noodles in boiling water.
5. When the noodles are done, strain them in a large colander. Rinse them with cold water or else they will be too hot to handle.
6. In a large casserole dish, spread a little tomato sauce along the bottom (1/4 inch thick).
7. Layer lasagna noodles, ricotta, spinach, and more sauce. Repeat until the top of the dish is reached or you run out of ingredients. The top layer should be noodles, tomato sauce and the other package of mozzarella cheese.
8. Cover the dish with tin foil. Bake 25 minutes.
9. Remove in foil, bake another 10 minutes.
10. Serve and enjoy!

**NOTE: unexplained happiness and love for all things may be a side effect.

Monday, September 15, 2008

Berry Berry Strata

This dish is so easy and tasty. Its also perfect when you have to feed a bunch of people - not too much prep work results in a lot of food!

From Food pics


Ingredients:

4-5 large croissants, broken into bite size pieces
1 cup part-skim ricotta cheese
1 teaspoon ground cinnamon
1 teaspoon white sugar
1 1/2 cup fresh berries, raspberries, blackberries, blueberries or halved strawberries with stems removed
1 cup milk
12 large eggs
1/4 cup fresh orange juice
1/4 cup brown sugar
1/8 teaspoon salt

1. Spray a 13 X 9 baking dish with oil. Take MOST of the croissant pieces and spread them evenly on the bottom of the dish.

2. Mix ricotta with cinnamon and white sugar. Dollop about half of the ricotta over croissants as evenly as possible.

3. Combine berries and spread half of them over the ricotta. Layer the rest of the croissants, then ricotta, then berries.

4. In a large bowl, combine eggs, oj, brown sugar and salt. Pour egg mixture over the berries, ricotta and croissants in the casserole dish. Cover with saran wrap and refrigerate at least an hour (or overnight).

5. Cover with tin foil, bake at 350 for 50 minutes. Remove foil, bake another 10 minutes or until the eggs are done. (note: this can be made in different size pans, deeper pans will require longer baking times).

From Food pics


From Food pics

Monday, September 8, 2008

Tofu Stix

(vegan)

I bumped into this recipe online, while I was searching for recipes for panko bread crumbs. These are Japanese bread crumbs, and i fell in love with them when my favorite sushi place started breading their teriyaki tofu with them. Tofu Stix aren't the most healthy snack, but they are pretty damn good.

Ingredients:

1 package extra firm tofu, drained
1 cup panko bread crumbs
1 cup plain bread crumbs
1 tbsp dried oregano
1 tbsp dried basil
1 tsp onion powder
1.5 tsp garlic powder
1 tsp dry mustard
2 tsp nutritional yeast
1-2 tsp salt
1/5 tsp ground black pepper
1 package soft silken tofu
1 cup soy milk


1. In a blender, mix the silken tofu and soy milk. Pour mixture onto a plate. (you might not be able to get all of it on the plate, just add some of it, and as it depletes, add more.

2. On another plate, mix the bread crumbs and all other dry spices. Again, you might not be able to fit everything on the plate, just keep adding it as it depletes.

3. After the tofu is finished draining, cut into sticks 1/2 inch thick. (about the size of mozzarella sticks).

4. Bread each stick by covering it in the silken tofu mixture and then covering with bread crumbs. Set aside until all are finished. (Be careful, they break very easily).


From Food pics


From Food pics


5. In a large skillet, heat about an inch of vegetable oil. When the oil is hot, add the stix. Cook until they are brown on the underside, then turn over (about a minute or two, depending on how hot the oil is). You don't want the oil to be too hot, because they will burn on the outside. Cook the stix until they are evenly browned on all sides.

6. As they come out of the skillet, place them on a plate with several paper towels (to absorb the oil). Serve hot with your favorite marinara sauce.

From Food pics

Thursday, September 4, 2008

Shumai

(vegan)

Traditionally, shumai are prepared with either pork or shrimp. They are these adorable little dumplings and can either be fried or steamed. I've played around a bit trying to make a vegan version, and my faithful taste tester says the shumai pretty good. I like them, too. Below is a recipe, and I've included instructions on frying and steaming them.

From Food pics


(they look like little soldiers of delicious, don't they?)

From Food pics


Ingredients:

gyoza wrappers (these are cool because they can be frozen)
1 block soft tofu - drained
1 handful fresh spinach - chopped
4 green onions - chopped
1/2 cup white onion - chopped
1 tsp salt
1 tsp garlic powder
1 tsp onion powder
pepper, to taste
1 tsp shredded ginger root
1 tsp miso paste

1. In a bowl, combine all ingredients (except gyoza wrappers). I use my hands, and mix them as much as possible.

2. Take a gyoza wrapper. If they were frozen, they are easier to peel apart if they are thawed a few minutes. Put the wrapper on a flat surface and wet the edges. Put a spoonful of the tofu mixture in the center of the wrapper.

3. Wrapping is a lot easier than it looks. Just pull up 2 sides and seal them together with water. Then pull up the two other sides and seal them, so it sort of makes a square (or at least has four corners. Try to push the open parts in so they are closed, and seal with water. If there are parts of the wrapper that stick up, press them so they are flat. The finished shumai looks sort of like a rose.

Now you need to decide if you want to fry it or steam them. I think they are excellent both ways and how i cook it depends on the audience. If I'm going to a party, I'll fry them, but if its for me and ej i usually steam them, or do half and half. It also depends on if i feel like I deserve fried food.

FRYING:

I heat 2 inches of vegetable or canol oil in an elecric wok, but a skillet works fine. Put the shumai in the hot oil, cooking for ~10-15 minutes. They should be brown on all sides. You may have to turn a couple of times while cooking.

STEAMING:

I use a wire colander and a pot of water. Not sure if its the best way, but it seems to work ok. So I boil some water in a pot and put the wire colander in it. Make sure the water itself isnt touching the bottom of the colander. Put the shumai in the colander (i can only do 3-4 at a time - make sure they aren't touching each other). Cover the shumai with a tightly fitting lid. Steam for about 20 minutes, turning halfway through. Its hard to tell when they are done, but the top part should be soft and not tough.

I like to serve the shumai with soy sauce mixed with honey or agave nectar (if vegan).

enjoy!

Wednesday, September 3, 2008

gnoc-gnoc-gnocchin' on heaven's door

(aka gnocchi florentine)

I love this dish because it is easy to make and versatile, plus I almost always have the ingredients on hand in the pantry. It's not vegan but can very easily be made vegan (see? versatile!). Just sub vegan pesto (or leave the pesto out all together) and don't add the romano cheese at the end. Voila! Vegan gnocchi. I've never made my own gnocchis, but it is a project I would love to take on - I hear its easier than making other pastas.

Gnoc-gnoc-gnocchin' on heaven's door

(aka gnocchi florentine)

From Food pics


Ingredients:

1 package dried gnocchi (frozen works too)
1-2 tbsp extra virgin olive oil
1 tomato, seeded and diced
1 garlic clove, minced
2-4 basil leaves, shredded
2-3 tbsp pesto
2-3 tbsp alfredo sauce (optional)
pecorino romano cheese, shredded
2 handfuls fresh spinach

1. Heat a large pot of salted water. Once boiling, add gnocchis. These only need a few minutes to cook, so keep an eye on them. You can tell they are done when they float on top.

2. Heat oil in a large skillet. Add minced garlic, saute for 30 seconds. Add the diced tomato and cook for a few minutes. The tomato should be letting out its juices and beginning to turn into a paste. Add pesto and basil. Saute mixture until a paste is formed.

3. Add alfredo sauce and mix well. Mix in the spinach a little at a time. The heat of the sauce will wilt the spinach. Don't let it completely wilt - the heat of the gnocchis will finish it.

4. Strain the gnocchis over the sink in a colander. Add to the skillet.

5. Using a wide spatula, combine the gnocchis with the sauce and the spinach. Everything should be covered and the spinach should be softened/almost wilted.

6. Serve, and sprinkle with shredded cheese for a garnish.

From Food pics