Thursday, October 13, 2011

Sweet n Sour Chik'n

How did "Chik'n" become the shorthand for "vegetarian chicken"?  I don't know, but it works for me! So, the "Chik'n" in this recipe has sort of a cute story involving some very nice Whole Foods employees. I made a version of this recipe when I lived in Tallahassee, and the Chik'n I used was Quorn non-breaded chick'n nuggets. I thought they were great, because I love Quorn products. Anyway, I moved to Winston-Salem and wanted to make this recipe for EJ, but I couldn't find any suitable non-breaded chik'n nuggets. What's a girl to do? I went to Whole Foods, and bought the Quorn chik'n cutlets, intending to cut them myself. I asked the cashier if there was a way I could request for Whole Foods to carry what I was looking for. He thought that they should have a better product, but wasn't sure what it was. The girl that was bagging my groceries brought me to the frozen "meat" section and showed me the Gardein scallopini cutlets (which I love, but weren't right for this recipe). Then she showed me these Delight Soy nuggets that I'd never seen before. Apparently they are what Whole Foods uses to make their Mock-Chik'n salad. I told her I hadn't tried the salad before, and she brought me to the deli and got me a (huge) free sample! It was delicious, so I bought the Delight Soy nuggets, and for no reason at all, the cashier gave me a 20% discount. Thank you for your excellent customer service, Whole Foods!

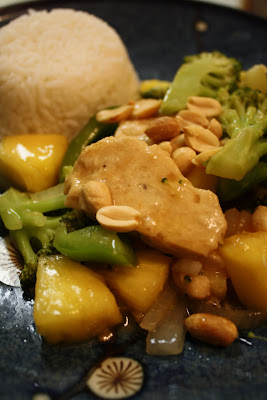
That was the longest introduction ever to a blog post, so without further ado, I give you Sweet n Sour Chik'n (which I will just say quickly was amazing!)!!

From Food pics


Monday, October 3, 2011

Italian herb spaghetti squash

I've been really wanting to cook "autumn" foods lately - the weather has cooled, leaves are starting to change, and since I moved from Tallahassee to Winston-Salem, this is my first real fall in awhile!

I was pleasantly surprised at how easy this recipe turned out to be, and how delicious. I used a lot of fresh oregano and some dried thyme and rosemary. I really wanted to use fresh basil, but my plant just died and I couldn't believe that the grocery store didn't have any! Even with this sacrifice, it turned out great. EJ and I will be eating good tonight!

From Food pics


Sunday, October 2, 2011

Israeli cous-cous with tons of broccoli

Israeli cous cous is so cool looking and so fun to cook with, I don't know why I don't use it more often. Just like regular cous cous, it goes well with pretty much anything! This was a spin off Heidi Swanson's double broccoli quinoa. I tried to make it taste a little creamy and cheesy and not too healthy. Even though its super healthy and low-calorie, you'd never know it, I swear!

From Food pics


Wednesday, August 31, 2011

Spiced Sweet Potato Fries

Sweet potato is my favorite of the fried starches - or in this case, of the baked starches. Baking the potatoes is just as easy and a million times healthier, and oh so yummy.

I recently heard something I hadn't heard before about making french fries - that with regular potatoes, you should remove excess starch by soaking them in cold water, but that with sweet potatoes, you should try to add some extra starch to add crispiness. I gave it a try with these, and they came out wonderful! Two thumbs up from me and EJ!

I used an Indian spice blend called garam masala - it should be available in the spice section of any grocery store. I've also made sweet potato fries with cajun seasoning, plain old salt, salt and sugar, or with garlic and onion powder. Use what makes you happy!


From Food pics


Tuesday, August 30, 2011

Watercourse Foods Tempeh Burger

This isn't the first time I've linked to Watercourse Foods in Denver, CO. I have only been there once, but I am now making it my personal mission to visit every time I visit Denver!

I did not try the veggie burger when I went, but I have heard raves about it. Their recipe has now been published, and since my wonderful husband loves veggie burgers, I thought I'd test it out. I took some liberties with the recipe*, and the burgers came out a little dry. Other than that, they were super tasty, and these sweet potato fries were the perfect accompaniment! There was a lot of prep work, but my food chopper gets the job done (or if you have a nice sous chef, that works also).


From Food pics


Monday, August 8, 2011

Soft pretzels


Ok...so these are sort of like the pretzels I learned to make in 7th grade cooking class. But so what? They were freaking amazing...the outside is salty and just a tiny bit crispy while the inside is soft and doughy. I crave these constantly. Serving suggestion: straight out of the oven with some yummy mustard!

From Food pics

Monday, August 1, 2011

Cabernet poached pears with blue cheese

My husband and I tried this dish on our 1 year wedding anniversary. We stayed in a B&B in Bar Harbor, and popped into this little place for appetizers and cocktails before dinner. We ordered the only vegetarian appetizer on the menu and were blown away with how amazing it was. If we weren't in a fancy restaurant, I think both of us would have licked the plate. EJ asked me how happy I would be if I had the recipe for the dish, and I agreed that it would be amazing to be able to recreate this exactly. Lo and behold, at the hostess stand was a book featuring restaurants throughout Maine, and Mache Bistro was in the book. What recipe did they decide to submit for the publication? Why, the Cabernet poached pears, of course!

I made this for my in-laws on the 4th of July, and it was a hit! Of course, I can't take credit for the recipe. This is unaltered from the original. I'm thinking about experimenting with different fruits instead of pears, though the pears were out of this world.


From Food pics


Tuesday, June 28, 2011

Basic Scrambled Tofu

Scrambled tofu is a simple and easy-to-put-together breakfast dish. You can dress it up any way you want - my favorite way to eat it is covered with beans and salsa (and guacamole when I really want to go crazy!). I served it (to myself) with an everything bagel-thin and two strips of fakin'. Yum.


From Food pics


Monday, June 27, 2011

Sausage and Gravy Filled Biscuits

I've become obsessed with Morningstar sausage egg and cheese breakfast pockets, and I eat them way more than I should. They're so good! I decided to try to recreate them myself, but make them vegan and maybe slightly more healthy (I don't think there is ever such a thing as a healthy biscuit, but at least I know I used good, fresh ingredients!)

Anyway, these came out fabulous. Seriously amazing. They were a little time consuming, so next time I make these I probably will just have the biscuits and gravy the old-fashioned way (unstuffed). The reason I stuffed these was because I wanted to freeze them. My husband and I are moving out of state, and I'm trying to cut down on the amount of cooking I do. I'll update this when I find out how they are after being frozen.


From Food pics


Thursday, June 23, 2011

Curried Quinoa Salad

I know I've mentioned this before, but quinoa is a superawesome grain for vegetarians and vegans - its packed with protein and nutrients. In fact, its so good for you that its being considered a possible crop in NASA's Controlled Ecological Life Support System for long-duration manned spaceflights!

The curry and the lime in this salad give it that oomph that all salads need to be considered awesome. Eat it hot or cold - it's really filling, so it does make a great meal. Especially if you want to get your booty back in shape for the beach this summer!


From Food pics


Friday, June 17, 2011

Whoopie Pies

Who doesn't love a whoopie pie? As a New Englander, I grew up with whoopie pies, but I never realized that they were a regional thing. So, for those of you unfortunate enough to be unfamiliar with the whoopie pie, it is a marshmallow-cream filled pie/cake/cookie combo, originally from the Amish. According to legend (legend? Are the Amish that old?), Amish women would bake these and pack them in lunches for their husbands. When the husband opens his lunch box for the day, he would see the pie and shout "Whoopie!" (Disclaimer: I'm not totally convinced that this is true, but whatever).

Anyway, this is a fun and easy take on the whoopie pie that my friend Kathleen showed me. Bonus: They're fat free, gluten free, AND they only need 3 ingredients! Kathleen uses a can of pumpkin puree, but I used squash puree instead, and it worked out just fine. I made these for my sister's graduation party and they were a HIT!


From Food pics


Wednesday, June 1, 2011

Crunchy Miso-Peanut Bowl

I've been on a peanut kick this week. Ever since I spur-of-the-moment grabbed a can of peanuts from Publix last week, I've been hooked. Instead of just gobbling them down by the handful (like I had been doing!) I decided to throw them in a recipe and see how it turned out. I also had some miso paste leftover in my fridge, and as it turns out, marrying peanuts and miso equals happiness. I ate this without any pasta or rice, but if you decide to add some you might need to add more of the miso sauce.


From Food pics


Guest blogger for Farmtina

My long time friend, fellow blogger, and bad-ass renaissance woman, Martina, keeps a farm in her Brooklyn apartment and writes abut her experiences. She's always looking for new information, so she asked my husband and me to write a guest blog post about the environmental impact of reducing meat intake. My husband and I are both full time vegetarians, but we believe that vegetarianism doesn't have to be an all-or-none thing - everyone should choose a level that they are comfortable with. Please READ ON to learn more about felxitarianism, and why animal agriculture is harming the earth.


From Drop Box

Saturday, May 28, 2011

Mango-Banana Smoothie

I freaking love smoothies. I make them a few times a week, especially now that it is officially summer and extraordinarily hot outside. I've been tempted in the past by those smoothie restaurants, and yes, I'll admit to getting them now and again if I'm in a hurry. However, every time I do, I'm disappointed by two things: There are way too many calories in those things, and they're never even half as good as the ones that I make at home with fresh, organic produce.

This smoothie was the perfect post-run snack. It has everything I need to refuel after a strenuous workout, plus its cold and satisfying. I added flax seeds to this, which are super healthy, especially for vegetarians (they contain a lot of nutrients like omega 3's that are primarily found in meat).


From Food pics


Thursday, May 26, 2011

Cold Soba Salad

This recipe was definitely a blog win! I adapted it a bit from this, and I was extremely happy with the result. This salad went together really fast, I usually have these ingredients on hand, and it was very, very healthy and flavorful. There's not a whole lot else to say about this, other than two thumbs up!


From Food pics

Wednesday, May 25, 2011

Macintosh Apple Chick'n Sandwich

My husband and I recently ate here, and absolutely fell in love. At first glance, the menu was nothing special for a vegetarian; they only had the obligatory veggie burger. When we looked a little more, we realized that everything can be made vegetarian (turns out, one of the owners is a vegetarian)!! So if you are ever in Winston-Salem, I highly suggest checking out Finnigan's Wake.

At lunch, I had the Granny Smith Chicken Sandwich, and they subbed the chicken breast for a Quorn naked Chik'n Cutlet. Of course, I wanted to recreate this sandwich when I returned home, and recreate I did! And I LOVED the result! This will probably be my staple lunch sandwich for quite a while.  The cheddar cheese goes great with the apple slices, and the honey mustard adds the tanginess that every sandwich needs. These cutlets can be a bit dry, so the sauce helps a lot with that, also.


From Food pics


Tuesday, May 24, 2011

A note about draining tofu

I thought I'd post a little 'how-to' here, since I'm finding out that a lot of people don't know how to cook tofu properly. Its good to know how to do, since it is such a versatile and delicious ingredient to keep on hand. I usually have an extra block of it in the fridge; it keeps for quite a while.

I buy extra firm, and Publix has even started carrying a lite variety that has fewer calories and less fat. That's what I like to buy, but there are so many brands out there now. Try a few and see what you like. Quick note: Don't try to drain silken tofu. This is the really smooth tofu you find in miso soup. Its great for soups, smoothies, and stuff like that, but its tricky to cook with. If you try to put it in a stir-fry it will just fall apart; but I've baked it before with great results.

When you open the tofu, it should be packed in water. Discard the water and place the tofu on a large plate. Place a smaller plate on top of it (upside down) and put something fairly heavy on top of that. I use a coffee cannister.


From Food pics


Let it sit like that for about 20-30 minutes then discard the excess liquid. Flip the tofu and drain for another 20-30 minutes.

From here the possibilities are endless. I like to marinate mine overnight and bake it (see Baked Pomegranate Tofu. You can sautee it, or even throw it in a deep fryer till golden brown. Good luck, and happy tofu-ing!

Squash loves spinach!!


From Drop Box


Could he be any more cute?

Recipe Improv: Asian Tofu Salad

To recap the Recipe Improv Challenge: I asked 3 friends to name the first non-meat ingredient that came to their minds. The challenge? I have to create a delicious meal using those ingredients. I definitely won this one - this salad was tasty, healthy, incredibly flavorful and packed with protein! (Of course, I am the only judge.) The ingredients I used were avocado, capers, and lemongrass paste.

I got the idea for this salad from a tofu salad that I recently tried, so this was a take off that. It was totally awesome, if I do say so myself. And extremely healthy. I love eating salads, but the problem is that I never feel full afterward. The protein in this salad definitely gets rid of that problem. Give it a try - I think you'll be impressed!!

And now a call for another recipe improv! The first 5 people to list the first VEGAN ingredient that comes to mind will be the winners! (Sorry, but you only win your name mentioned in my blog). So thanks to April and Jess for suggesting these awesome ingredients!


From Food pics


Friday, May 20, 2011

Halava

If you attend Florida State University, you are probably aware of the amazing vegetarian lunches served in the Student Life building (previously in the International Student Center). These are colloquially referred to as "Krishna Lunches", because the head chef, Daru, is a Hare Krishna who also runs a local yoga center. And he cooks amazing vegetarian Nepalese/Indian food every day.

Halava is one of his most common desserts, and Daru calls it a "helluva good dessert" (which is a good way to remember it!). Not the most healthy, but when is a dessert actually healthy? When I made it for myself, I reduced the butter and sugar by about 25% each, and it was fine, though not quite as good. Below I've listed "fruit" as an ingredient, and really, you can use anything you want. This time I used about 4 oz of canned pineapple, but I've made it previously with about 1/4 cup blueberry ginger compote, and that was my favorite. You could do chocolate, peanut butter, or just about anything you can think of.

From Food pics


Tuesday, May 17, 2011

Falafel-Crusted Tofu and Spinach-Pomegranate Salad

Three words can describe this meal - yummy, easy, and healthy (only two of these words describe the fried version). This tofu and salad would go great with Israeli Cous Cous (check back next week for the recipe) for a wonderful Middle East inspired meal. It also looks pretty fancy, which is good for the cook, because this really didn't take any time to throw together. I used two methods of preparing the tofu - baking and frying. They both have their perks, just depends on what you're into. Obviously, the baked tofu is way healthier, but tasted a little dry (but I bet a tzatziki sauce would be great!) . They were both easy, so try both and see what you like!

From Food pics


Tuesday, May 10, 2011

Recipe Improv: Bella Burgers with Beet-Slaw

Another recipe improv! This was was definitely more tricky than the last one. Just to recap: The recipe improv is where I ask 5 friends to name the first ingredient that comes to their mind, and I have to make a meal using those 5 ingredients. This time, my ingredients were beets, mushrooms, bacon, cheddar cheese and greek yogurt. There was  a little bit of a problem here, because I didn't specify in the rules that I wouldn't use meat as an ingredient. My friend Seth suggested bacon, but I cheated and used fake bacon (a.k.a. fakin').

I was also having a hard time thinking of something decent to cook with these ingredients. My top two choices were sushi and an omelette, but my friend Alisa suggested the burger. After she suggested it, I couldn't think of anything else! So thanks, Alisa, this was a really good idea. Honestly, I wasn't sure how tasty it was going to be, but it was really good! The sweetness of the beets went well with the saltiness of the cheese and bacon. All in all, I'd call this a win!

Now I need your help again - another call for ingredients! Please keep them all vegetarian this time. Instead of 5 ingredients, I think I'm going to cut it down to 3 and see what that's like. So, the first 3 ingredients named (from 3 different people) will be used. Annnnd...go!


From Food pics


Carrot-raisin-yogurt shake

Every morning, I go running with my good friend and fellow blogger, April. We live in Florida, and its summer, so as you can imagine our runs are pretty grueling. This morning, it was particularly hot and humid. After the run was over, she told me about a shake that she's made that she thought would be a great post-workout snack. This is the kind of shake where you think about it, and you can't imagine that it would be that good. So, after I got home, I really wanted a good, refreshing, healthy post-workout snack, and I decided to give April's shake a try. Holy cow it was good!  April used actual carrots in her shake, but I had carrot juice on hand so I just used that. For extra protein just add some plain or vanilla protein powder. Enjoy!


From Food pics


Monday, May 9, 2011

Fakin'-wrapped tofu dogs

Has anyone else noticed that meat has become a total fad? Like, I went to a girlfriend's house this weekend and saw a batch of homemade chocolate chip cookies. I actually felt the need to ask if there was bacon in them before I ate one! According to Google trends, searching for bacon has definitely gone up in the last couple of years, especially in comparison to other meats. What do you guys think of this meat bandwagon (the meat-wagon)? I'm interested to hear the opinions of meat and non-meat eaters.


From Drop Box


Back to my fakin'-wrapped tofu dogs. They were ok - definitely a novelty food item that I probably won't make again. I'm a fan of the Morningstar Farms "Bacon" (aka Fakin') and their tofu dogs are pretty good, too.


From Food pics


From Food pics


Friday, May 6, 2011

Roasted Beets

Remember The Beets? Oh wee ohhh...killer tofuuuuu...

These roasted beets were so good - they don't even taste like a vegetable! Salty and sweet, they taste like something I would feel guilty eating at a carnival! And they were so easy!

Ingredients:

Beets (washed super well)
olive oil
sea salt and fresh cracked pepper
(or experiment with spices of your own!)

1) Preheat oven to 400.

2) Slice beets to about 1/8 of an inch thick.

3) Drizzle with olive oil and spices. Layer on a baking sheet and bake for 10-12 minutes. Flip them, add more spices if desired, and bake another 10, or until nice and crispy.


From Food pics

Steamed artichokes

I remember being a little kid and my mom (only once) made steamed artichokes. We sat around the table and pulled off the leaves, and we dipped them in melted butter. Of course, the artichoke was only a vehicle for butter back then (and there is nothing wrong with that!). Now, I'm a little older and a little healthier, and as much as I would love to dip my chokes in some garlic butter, I opted for some hummus instead. Not too shabby, if I do sy so myself. And super easy.


From Food pics


Thursday, May 5, 2011

A (garlicy) hummus among us!

This was knock-your-socks-off and hope-you're not-kissing-anyone-soon garlicy hummus. You might not want to eat this if you have a first date coming up. You can scale down the garlic if you want, its up to you.  Also, I used roasted garlic that I roasted specifically for this recipe. The olive oil that I used in the hummus was the same oil I roasted the garlic in.

Ingredients:
1 can chickpeas with 1/2 the juice reserved
1/2 a clove raw garlic
2-3 cloves roasted garlic
1 Tbsp olive oil (garlic infused is best)
1 Tbsp tahini
1 Tbsp lemon juice
1 tsp garlic powder
salt and pepper, to taste

1. Combine all ingredients in a blender. You might need to periodically scrape the sides down. If its a little too dry for your taste, add water by the tablespoonful.


From Food pics

Thursday, April 28, 2011

Sourdough Ciabatta - AKA Dave


From Food pics


A few weeks ago, I took on the challenge of making a loaf of sourdough ciabatta bread. This was actually a quite a big challenge - It took 9 days for me to make this bread. Yup, you read that right. 9 days for one loaf of bread (ok, technically it was 2 loaves).

Why so long to make bread? Well, a few things need to happen to make any kind of sourdough - the first being the development of a "sour starter". The purpose of a sour starter is to develop a lightly acidic flavor common to sourdough. This is done by allowing "wild" yeast present in the air and flour to feed and cause fermentation in the starter. The starter needs to be fed every day, and this was actually quite creepy. I would read things like "The first thing to remember is that the starter is a living thing. It needs to be fed and cared for regularly." So here I have in my kitchen a large bowl of something growing and fermenting and demanding to be fed daily. Because it stopped being a thing and started to be a someone, EJ and I decided to name him Dave.

From Food pics


Wednesday, April 27, 2011

Weeknight Stirfry

Too lazy to cook but you still need to eat? Fear not - This is the easiest stir fry you'll ever make. It came together in under 20 minutes, and there are totally a few shortcuts you can take if you have even less time. There's not much for cleanup, either!

I just used what I had in the house - you could take this any direction you want! Scramble an egg and throw it in (don't crack the raw egg into the dish and cook it in the dish - I've done that before and its not the same), add some sprouts (yum!) or any random veggies or beans that you have on hand.

Ingredients:
1 cup brown rice
2 cups water
1/2 block of extra firm tofu
about 1 cup frozen broccoli
about 1/4 cup slivered almonds
several shakes each of soy sauce and rice vinegar

1. Cook the rice. I have a rice cooker that I am obsessed with. I can never get the proportions rice : water to be perfect for brown rice - its always too dry. After the rice was done, it wasn't completely cooked, so I added about 1/2 c more water and cooked again. This time it was perfect.

2. While your rice is cooking, get your tofu. I didn't even drain mine - I just gave it a good squeeze over the kitchen sink. Cut it into cubes and saute for about 10 minutes, until its mostly brown.


From Food pics


3. Grab whatever veggies you're going to use. I basically always have frozen broccoli and/or brussels sprouts on hand for nights like this. I used broccoli this time. To thaw it, I threw it in a saucepan with a little water, covered, and heated it for about 4 minutes, until - and this is a no brainer - the broccoli is thawed. (You can use the same wok or skillet that you cooked your tofu in, just remove the tofu first.)

4. Throw everything together in a wok or skillet, add the sauces, taste for flavor, and you've got yourself a weeknight stir fry!


From Food pics

Saturday, April 23, 2011

Recipe Improv: Vegetable tempura with quinoa and arugula

Last week I asked 5 friends to name the first ingredient that came to their mind. The ingredients were: quinoa, potatoes, zucchini, peas, and arugula. The challenge? I have to make a meal out of it. This was fun, and I got to be a little creative with what I made. Obviously there are a million combinations, but I settled on vegetable tempura over quinoa with an arugula salad. Totally awesome, if I do say so myself.

So check out the pics and the recipe below. I'd like to do this more often, and I need your help. The first 5 comments with ingredients will be my next meal! (ok, not my next meal, but you know what I mean).


From Food pics

Wednesday, April 20, 2011

Apple-Carrot-Ginger Juice

Demitri Martin thinks that oranges were named before carrots...I think he must be right.

Anywho - I got my juicer about a year ago. They can be expensive, so I got a refurbished one from Amazon. Its worked great - its not super snazzy like some the ones out there, but it does the trick and cleanup isn't too terrible. I don't juice a lot - I want to get more into it. So, here's a call for suggestions: I want to hear what YOUR favorite juice recipes are!

Apple-Carrot-Ginger is pretty sweet and tasty. I feel that I should just mention that I adore ginger, so I added a lot of it here - so much that it burns my tongue a little when I drink it. If you're not so keen on the ginger, I would add it little by little until you find an amount that you're happy with.

This made about 32 oz.

Ingredients:

5 apples (mine were Gala)
1 lb carrots
3 tbsp fresh ginger root

1) Wash all your fruits and veggies and cut them into pieces larger enough to fit in your juicer. You don't have to peel them, even the ginger, but you should remove the apple seeds because they contain trace amounts of cyanide. It should be harmless, but you never can be too careful, right?

2) Juice and enjoy! Throw in an ice cube and sip it on your back porch, while swinging in a hammock listening to the most current indie music.

From Food pics

Tuesday, April 19, 2011

Monday, April 18, 2011

Focaccia

My brother-in-law got me this awesome artisan bread book for Christmas, and I've been experimenting making bread the "old fashioned" way. (Wait until you see my post later this week about what I'm growing in my kitchen...I call it Dave.)

Anyway, I made this focaccia a few days ago and I LOVE it. Its a 2-day recipe, so make sure you plan ahead if you are making it for a special occasion. It keeps really well - I sliced it and have been keeping it in the fridge and grabbing a piece every time I go in the kitchen. Don't be intimidated by the semi-complicated bread recipes. They're not so bad.

You can do anything in the world for toppings, I used a combo of sea salt, pepper, garlic powder, onion powder and rosemary with a pinch of cheddar cheese. Be creative - just don't overdo it. Its a focaccia, not a pizza.

Ingredients:
For the biga:
1/2 c water, 55 degrees F
1 1/3 c bread flour
a pinch of instant dry yeast

Final dough:
2 c water, 86 degrees F
biga from the previous day
3 tbsp olive oil
5 c (plus 2 1/2 tbsp) bread flour
2/3 tsp instant dry yeast
1 tbsp salt

1. Make the biga the day before you want to serve the bread. A biga is a type of preferment (literally, PRE-ferment. What you're doing is fermenting some of the bread ingredients prior to making the bread). Put the water in a bowl and combine the flour with the yeast. Mix in with the water until it is totally homogeneous. Mix it well - this step is important. The biga should be stiff and slightly dry. Place it in a lightly oiled bowl (big enough for it to double in size) and refrigerate for 2 hours. Remove, and let it sit at room temperature for 10-12 hours (though, honestly, mine was a lot closer to 20 hours and it was fine).

2. The next day, make your final dough. Put the water, biga and oil into a large bowl and break the biga into lots of tiny pieces; this will take at least 5 minutes. Combine the flour and yeast together and add them to the biga mixture while stirring. Add the salt, and work the mixture with your hands for at least 5 minutes. Make sure the biga is completely broken down and a new, homogeneous dough is forming. The dough will be VERY tacky and wet, and lack structure. Cover the dough and let it rest in a warm place for 45-60 minutes.

3. Place the dough on a lightly floured countertop and fold it into thirds (this really doesn't have to be perfect - all this does is expel air out of the dough...but be gentle). Cover with plastic wrap and let it sit 10 minutes.

4. Uncover the dough and divide it into 3 equal size pieces. On a cookie sheet lined either with parchment paper or a lot of flour and cornmeal, place each loaf and lightly round each one. Next, stipple the dough with your fingertips (fingertips should be dipped in olive oil). Basically poke it a whole lot. This helps keep the bread from puffing while baking, but it also gives each focaccia a unique texture and allows it to hold toppings. While you're doing this, work on stretching the dough into roughly a 10x6 inch rectangle. Lightly cover the dough and let it sit for 30-40 minutes. When toughed, the dough should spring back halfway.


From Food pics


5. Preheat the oven to 375. Prepare the toppings for the focaccia.

6. 10 minutes before baking the bread, place an oven-proof dish with 3 cups of water in the oven (to produce steam while the bread is baking).

7. Uncover the dough and lightly stipple it again. Add the toppings. If you have a baking stone, slip the bread onto that. If not, just leave it on the baking sheet (I've said it before and I'll say it again - if you don't have a pizza stone, get one!).

8. Immediately reduce the oven temperature to 350.  Bake for 18-20 minutes, then remove the water and bake for another 5. You want it browned and crisp, but not overdone. I actually took mine out a little early because I wanted the bread soft. This came out amazing. I served mine cut like breadsticks and with marinara sauce (served? who am I kidding? I ate it all myself!!)


From Food pics

White Bean Pate

This was the last of my "Pantry Challenge" recipes. It was really fun and I certainly enjoyed making room in my kitchen for new food, but now I'm happy to be trying out some new recipes this week.

White bean pate was super easy and yummy. I ate it with these fancy rosemary crackers that i got from the Sweet Grass Dairy store in Thomasville. Its a lot smoother than hummus, which is exactly what I was going for. I used canned navy beans, so they blended really easy. I actually just used a potato masher to blend them - I never even needed a mixer!

Ingredients:

1 can navy beans
2 tbsp ranch dressing (I would have used tahini if I had any)
several pinches thyme
several pinches black pepper
onion and garlic powder

1). Mash everything up until smooth. Taste for spice levels.


From Food pics

Saturday, April 16, 2011

Flour Tortillas

I also made these during my pantry challenge, but didn't get a chance to post them. My friend Joanne gave me this recipe a few years ago, and I forgot I had it until now. Making these tortillas was much easier than it sounds, and they came out amazing! You can fill them with all kinds of yummy fillings, or just eat them plain!


From Food pics


Yield: 12-14 tortillas

Ingredients:

2 1/2 c flour
1/4 cup vegan margerine (melted)
1 tsp salt
3/4 c hot water

1. I melted the butter in the hot water. Mix all the ingredients in a large bowl.

2. Knead the dough for about 5 minutes, or until its homogeneous. There is no need to do it on the counter top - I just kneaded it right in the bowl.

3. Tear apart golf ball size chunks and roll them into a ball with your hands. On a very lightly floured counter, roll each ball out with a rolling pin until it is as flat and round as you can get it. Seriously put some elbow grease in here - the flatter, the better.

4. Cook each one in a nonstick frying pan for a couple minutes each side. I don't think you need to use oil - I used a tiny bit of spray oil for my first few, but then figured I didn't need it, and the rest came out just as good. Careful not to overcook these - overcooking will make them stiff.


From Food pics

(This one is filled with spinach, salsa, black beans, and a little cheddar cheese - delish!!)

Pantry Challenge Day 7 - Mexican Pita Pizzas


Didn't I say I'm moving towards an empty pantry? I seriously need to go grocery shopping! These mexican pizzas were exactly how they look - fast, filling and pretty tasty. I mean fast, they went from fridge to plate in under 10 minutes. Not the most nutritious of meals, but they'll do when there is nothing else in the house!  

Ingredients:
4 pita pockets, carefully pulled apart
1 cup refried beans (if you buy a can, make sure they’re vegetarian!)
½ cup salsa
1 cup shredded cheese (I used part skim mozzarella)
About ¼-1/2 cup sliced green onions

 Preheat oven to 350 
 On each pita, spread about ¼ cup refried beans
 Then spread salsa 
  Sprinkle with cheese
  Bake at 350 for 7 minutes, until cheese is melted and pita is crisp
 Garnish with green onions.

From Food pics

Friday, April 15, 2011

Pantry Challenge Day 6 - Crumbled veggie burger breakfast pita

I am definitely moving towards an empty pantry! This recipe took about 5 minutes to make, and it was surprisingly tasty. Also, by trying this recipe, I inadvertently discovered that cream cheese smeared on a veggie burger is a very tasty snack!

Ingredients:

1 egg
1/2 veggie burger (I used an Amy's veggie burger; it was quite large so I only used half)
1 tbsp ranch dressing
cilantro
salt, pepper
2 tbsp light cream cheese
2 tbsp salsa

1) Microwave the burger until its no longer frozen (it doesn't need to be heated through, but you do need to be able to break it up)

2) Crack your egg in a bowl, add the salt, pepper, and ranch. Whisk until its blended.

3) Crumble your burger into a small non-stick skillet over medium heat. Add the egg mixture. I added my cilantro here, but it was a cilantro paste that comes in a tube. If you're using fresh cilantro, I would wait a little longer to add it.


From Food pics


4) While you're waiting for your eggs to cook, you can prepare your pita. By prepare, I mean spread some cream cheese and salsa in it. You could toast the pita, but I left mine untoasted.

5. Scramble the eggs, but don't break them up too much - leave the pieces large.

6. Stuff the pita. Add some salt and pepper if it needs it. Enjoy! (Add some fresh spinach or baby greens here if you have any!)


From Food pics

Thursday, April 14, 2011

Pantry Challenge Day 5 - Farfalle with crumbled tofu

Wow, I'm on day 5 already? Well, the rest of the recipes will be a little more pantry-esque, but they will still be tasty (I hope)!

Farfalle with tofu was good - I accidentally added way too much pepper. It was still ok, just a little overpowering. The fresh basil was nice (I keep a large basil plant in my kitchen), though I really wish I had a few garlic cloves in the house. That would have added a better flavor. Cheese makes things taste better - Romano cheese sprinkled on top would have added a lot here.

Ingredients:
1 block firm or extra firm tofu, drained
1 can diced tomatoes
1/2 box farfalle pasta
2 tsp olive oil
4-5 leaves fresh basil
salt, pepper, garlic powder, onion powder

1) Bring a pot of salted water to a boil. Cook the pasta until al dente.

2) Drain the pasta and return it to the pot. Add the oil, spices, tomatoes (drain them) and taste for spice levels.

3) Crumble the tofu in your hands until it resembles feta cheese and drop it in the pot. Heat for about 10 minutes, until the tofu has lost its extra liquid and is heated through. Add the basil. Enjoy!


From Food pics

Wednesday, April 13, 2011

Pantry Challenge Day 4 - Jerk Seitan with fruity quinoa

My favorite description of jerk flavors is, of course, from Isa Moskowitz. She says that when you're putting the jerk seasoning together, you're thinking that there is no way that these flavors will go together. When the final product comes out and you taste it, you're a jerk for ever questioning.

I used a prepurchased block of seitan that had been sitting in my fridge for weeks. I'm out of vegetables, so I was hoping that by adding some dried fruit to the quinoa then that would count...sort of.

Jerk seitan

Ingredients
seitan, cut into bite-size pieces
red pepper flakes, to taste
1 tsp thyme
1 tsp onion powder
1 tsp garlic powder
1 pinch each of allspice, nutmeg and cinnamon

1) Put everything in a non-stick skillet. Saute for about 5-8 minutes, until the seitan is heated through and slightly browned.

Quinoa

1 cup quinoa
1 cup vegetable broth
handful dried fruit - I used about 1/4 cup each of dates and cherries
1/4 cup crushed pecans

1) In a saucepan, bring the veg broth to a light boil. Add the quinoa. Reduce heat to low,cover, and cook 15 minutes stirring occasionally. Taste it to make sure its done; it may need a few more minutes. The measurements here are less finicky than when you're cooking other things, like rice. If the quinoa starts looking dry before it is done cooking, add some water or broth. If its done but still kind of watery, just let the cover off the saucepan and let it evaporate over low heat.

2) When the quinoa is done cooking, stir in the fruits and nuts. I was thinking of adding some curry spice here, but I decided against it because the broth made it so flavorful.


From Food pics

(This is really one of those times that I wish EJ was here to do the photography; he would have made this dish much more appetizing than I can. But I promise - it was really good!!)

Tuesday, April 12, 2011

Pantry Challenge Day 3 - Chick-pea salad pitas

Obviously I wouldn't cook something that I didn't think would turn out good. I was interested in how these would turn out, but I was blown away when they ended up being AH-MAZING. I wish I had about 3 more cans of chickpeas so I could eat these every day! The carrots and onions give it that kick and crunch, though I do wish I had some celery to chop up in there. If you so desire, add a bit of relish to the recipe (I strongly dislike pickles and relish). A potato masher worked well for the smashing, if you're making a large batch (which you should) a blender or food processor on a pulse setting might be better.

Ingredients:
1 can chickpeas
1/3 cup fat free mayo (or vegan mayo)
3 tbsp fat free ranch dressing
1/4 cup matchstick carrots (mine were quite long so I broke them into smaller pieces by hand)
scant 1/4 cup chopped red onion
1/2 tsp thyme
several shakes of garlic and onion powder
about 1/2 tsp fresh cracked black pepper
a few pinches of salt (to taste)

1. (This is easy) Mash everything up in a bowl. Taste to make sure you like the flavor combo. Spoon into a pita pocket and enjoy!! If you have some lettuce or tomato to put in the pocket as well you should definitely go for it!


From Food pics

Monday, April 11, 2011

Pantry Challenge Day 2 - Potato Rosemary Pizza

Ok...potatoes on pizza...I know its a little weird but just bear with me for a moment. The first time I had a potato pizza was in Cambridge (MA) at Cambridge 1 and I was blown away. I decided to give my own version a try, and it came out great!

From Food pics


Ingredients:
1 recipe Basic, all purpose dough
1/2 potato
1 cup milk
3 tbsp flour
3 tbsp fat-free cream cheese
1 tsp rosemary
several shakes of onion and garlic powder
salt and pepper, to taste
1/2 cup shredded cheddar cheese

1. Prepare the dough as directed. Shape into a pizza pie. Preheat the oven to 500.

2. Make the rosemary cream sauce. Put the milk in a saucepan and heat. Just before it boils, add the flour and whisk. Allow to boil for about 10 seconds and whisk constantly for a minute or two. The mixture should have thickened; if it didn't, try adding more flour and let it boil again.

3. Remove from heat and stir in the cream cheese, onion, garlic, salt and pepper. Taste for flavor.

4. Place the potatoes in a single layer on the pizza. Spread the cream sauce as evenly as possible over the potatoes and sprinkle with rosemary. Add the cheese on top of that.

5. Bake for 8-10 minutes, or until the crust begins to brown.

From Food pics

Sunday, April 10, 2011

Pantry Challenge Day 1 - Pomegranate tofu with roasted potatoes

These were really nice. The pomegranate molasses added a bit of fruit flavor without the sweetness, so it still felt like a savory dinner dish. I did have to buy the molasses online - I purchased it several months ago for a different recipe.

Baked Tofu

For the marinade:
1 cup vegetable broth
2 tbsp balsamic vinagrette
1 tbsp pomegranate molasses
1 tsp thyme
lots of shakes of garlic and onion powder
salt and pepper, to taste

1 block firm or extra firm tofu

1. You'll definitely want to drain your tofu for this. Place the block of tofu on a plate, and put another plate over it. Place a heavy object on that plate. You'll have to discard the tofu juice every once in a while. I let mine drain for an hour.

2. Slice the tofu and put in a bowl with the marinade. Let marinate for at least an hour, but overnight is better.

From Food pics

2. Preheat the oven to 375. Spray a casserole dish with cooking oil. Bake the tofu for 20 minutes, then flip each piece and bake another 10 minutes. Serve with a little extra marinade.

Roasted Potatoes

Ingredients:
1 potato (I think mine was an Idaho...?)
Spice blend (I used the peppercorn salad dressing spice blend from Penzey's, but I think any combo of garlic/onion/salt/pepper with some sage or thyme would have been great.

1. Slice the potato into pieces that are about 1/2 an inch thick and place immediately into cold, salted water.

2. Bring the water to a boil and let it boil for 15 minutes.

3. Spay a cookie sheet with oil. Line the potatoes on the sheet and sprinkle with your spice blend.

4. Roast the potatoes in your preheated oven for 10 minutes. (Yes, I'm aware that it is possible to roast potatoes without boiling them first, but I wanted to use half of this potato for another recipe...check back later this week to see it).

From Food pics